Wow! When I started writing this, I realized how many of the factors I ignored when I first settled on where I would go if I needed to bug out for an extended time. Once I acquired by destination, I began to prepare some very basic setups like a weapons and ammo cache, a dried food cache, a tools cache and a planned escape route. I also planned a primary, alternate and tertiary route from my home to my destination. Once you are settled, some perimeter defenses will be in order but we can cover that later.
Every bug out situation and circumstance are different. Everyone has their own preferences, requirements and restraints. Every environment where you are living and every condition or disaster will present different challenges. The important thing is that you start the planning process now, before you need to leave. If it is at all possible, Bug In, don’t leave at all. This option requires a different set and level of planning and preparation. It also has its own set of dangers and challenges. In the end, you still may have to bug out. The problem arises if you wait too late. In this article, I will try to summarize the things you need to consider in your bug out plan. Every decision you make will result in a consequence, whether positive or negative. Every decision will lead to another decision and consequence. You will not be able to cover every possible scenario, but leave room for alternatives and modifications to your plan.
#1 Question: Why do I need to Bug Out? Your answer may be several different reasons and you will need to prepare for each. Examples: Natural disaster, Civil unrest or conflict, economic collapse, EMP attack, or even TEOTWAWKI. So, anything from short term or moderate term temporary, to long term temporary or even permanent.
#2 Question: When do I need to Bug Out? Again, depending on the circumstance, your answers may differ or you may have multiple ones. Examples: If your reason is a natural disaster and you have some advance notice (like for a hurricane), you may want to leave several days before the event occurs. In the case of an earthquake, you may want to leave immediately to get to a safe zone. In the case of Civil unrest or conflict, you may want to leave as quickly as it is safe to leave (an Escape, Elude and Evasion Plan is highly recommended). In case of a global economic collapse, you should know long before you have to leave and have made long term strategic plans to not only bug out, but perhaps to start a small homestead somewhere in a sparsely populated rural area where you can grow food and livestock. It takes several years to build a successful homestead and is a very different lifestyle.
#3 Question: Where do I go? There are a wide range of choices here, depending on where you are starting from, how long you need to stay and your answers to #1 and #2. Examples: If you live in a forecasted hurricane impact area, move to a location well outside of the targeted zone. Even there, food, water, power and shelter may be limited. If the hurricane strikes your home location it could be several days before you are allowed back in the area and weeks before utility services are restored. If in the case of civil unrest or conflict, the important thing is to get to a safe location. Early incidents may be localized in urban areas and may only last for weeks, but the possibility of long-term escalation and wide spread violence may also exist. Hope for the best but plan for the worst. All other scenarios are long term or permanent, so if you are preparing for this, you must select a bug out location discussed next.
#4 Question: What should I consider in selecting a long-term Bug Out location?
Are you planning on buying a property or trying to find public land?
Does the property have access to water (fresh water is essential) (River, lake, large pond, coastal)?
If in a coastal area, you will have to catch rainwater or distill.
Does the property have access to natural fuel (wood, coal)?
Does the property have an area to build a long-term shelter?
Protection from wind, flash flood or just heavy rain, snow?
History of forest fires, brush fires, flooding?
Any rock formations such as a cliff, ridge or rock out cropping (maybe even a small cave (caution here with building a fire that might collapse the entrance or an animal occupation)?
A level spot to build a small cabin and enough trees to harvest for materials? This is an ambitious undertaking requiring tools, skills and manpower.
Is the property located in an isolated but accessible area?
Are small and/or large game animals sufficiently available for hunting?
Are neighbors closer than 1 mile away?
Is the property located within sight of a public road? (not advisable)
If the property is heavily wooded, Is there an area to plant a garden or enough of a break in the tree canopy for at least six hours of sunlight?
If you are purchasing the property, does it adjoin a BLM (Bureau of Land Management) area, a wildlife management area, an industrial tree farm, or a large unpopulated forest area?
Is the property defensible?
How far is the property located from your home?
Can you reach it in 3 to 4 days if you go on foot? At an average hiking distance of 10-12 miles daily, the property should not be more than about 35-40 miles away. More than 3 days of food will be difficult to pack.
If you plan to drive to the property, will you have enough gas to reach it on one full tank?
Depending on the situation, gas may be limited or not available at all.
You could plan to store a 5 gallon container of gasoline along the route in hidden cache locations, but it would need to be refreshed at least every six-months and if you have to use an alternate route, you would miss it.
Depending on the bug out circumstance, you may be able to plan for a longer distance, but you will have to leave in advance and plan your refueling stops.
If you arrive at your destination during the night, be sure to have some form of illumination in your bug out bag. You will need to set up a quick shelter and gather wood for a fire. If you preplan this, you can stack firewood and kindling under some plastic sheeting or in a large contractor’s waist bag somewhere on the property during a previous visit.
#5 Question: Who is going? If you are alone, the planning is easier. If you are not, you must consider:
How many will accompany you?
What are their ages?
What are their needs in terms of food, water, clothing, medicine, and mobility.
How much weight can they carry for a 10-12 mile trek per day.
All of this, of course, helps determine the type and distance of your Bug Out location.
#6 Question: How do you do all of this? The honest answer is meticulous research and planning.
Begin by taking some time to sit down and write out your answers to the above questions.
Research a general area you would consider to be a safe location.
Research and hone-in on two to three specific locations that meet your requirements. They may be in different directions from your home.
Locate the properties on Google Earth to understand the surrounding area, available water, adjacent properties, etc.
Map the routes to the desired locations, noting the distance and any intermittent stops you will have to make, time to travel on foot, time to travel by vehicle, possible refueling points.
If you have to make multiple stops, where will they be located and how secure are they?
Don’t forget to plan for alternate routes, should your main route be blocked.
If you purchase a property, make multiple visits and build caches to ease the burden of carrying too much. Get to know your neighbors to see if they are of the same mindset and are not meddling.
Is there room and a good location for a permanent structure?
If planning a long-term shelter, how will you dispose of human waste?
Sanitation and protection of your water source is a must.
Remember, last minute decisions typically lead to disastrous consequences. START NOW!
What if it is not The End Of The World As We Know It (TEOTWAWKI)
The 2026 tornado season has produced F0 to F4 tornados across most of the mid-west destroying homes, barns, vehicles, and trees along their paths. Several have been responsible for injuries and deaths. So, I was thinking what if the event that causes you to seek emergency shelter is not a major civil uprising, and EMP attack, or something bigger? What if your home is destroyed by a natural event or your power, water and food supplies are unavailable for days or even weeks, maybe months. What if FEMA, the Red Cross and other agencies can’t assist you? What if you are left to fend for yourselves? ARE YOU PREPARED?!
This type of disaster is far more frequent than any other possible world-ending event, but it is one that our prepping community talks less about. It is one that hits at any time of day or night without a lot of notice. And if you are unprepared, it can have the same disastrous consequences as any other Bug Out scenario. If you have been fortunate enough to weather the initial storm, what next? If no immediate help is coming, you must rely on your knowledge, training and practice, and your preparation planning. If you haven’t prepared, your immediate future is bleak and maybe will have deadly consequences.
Do you have a fire making kit? Is it available or was it blown away in the storm? If you were able to salvage your bug out bag, it should be accessible. But, have you practiced using it to start a fire in the rain or wind where your cover or shelter is limited?
Do you have some type of water filtration system or personal water filter and an available water source? Most likely, any standing water will be contaminated, so purification is essential. And, you need water to survive more than any other resource. If you do have a filter, have you used it before and know how to clean it?
Do you have some form of temporary shelter or know how to construct one with the limited resources available? Have you practiced building one in hostile conditions (rain, wind, darkness). Do you have a food source such as a root cellar or cache? If not, what other resources might be available, such as fishing (a lake, river or pond) or small game that you can trap or snare? Do you have the knowledge to forage? Do you have equipment? Have you practiced? HAVE YOU PRACTICED??
Do you have a medical kit? Not just a package of band-aids but a first aid or trauma kit or both. Your kit should include bleed-stop, hemostatic gauze, Israeli bandage, tourniquet and marking pen to record the time applied, iodine swaps, alcohol wipes, zip wound closures, burn cream and Advil, Tylenol, or ibuprofen at the minimum. However, the most important thing for first aid is knowing how to apply it.
If you haven’t taken a Red Cross First Aid course do so now (https://www.redcross.org/take-a-class/first-aid/first-aid-training/first-aid-classes?srsltid=AfmBOorEOfjxeFHHTAeSfBjm_VYHoLD-X1nv-PglQHPfhuDdwa7pClHA). Learn how to treat wounds and prevent infection. Learn how to use a splint. If you are in a situation where medical help is not available, you must know this in order to save your life and the lives of those with you. Please understand that the use of a tourniquet is a serious matter that can lead to limb loss or death. Do not take this lightly and learn proper application techniques. Learn how to treat victims in shock. Learn CPR.
Remember, seconds and minutes matter in case of an emergency and you are the First Responder (maybe the only one). Be ready, be prepared, and be safe.
What Should I Pack in My Bug Out Bag?
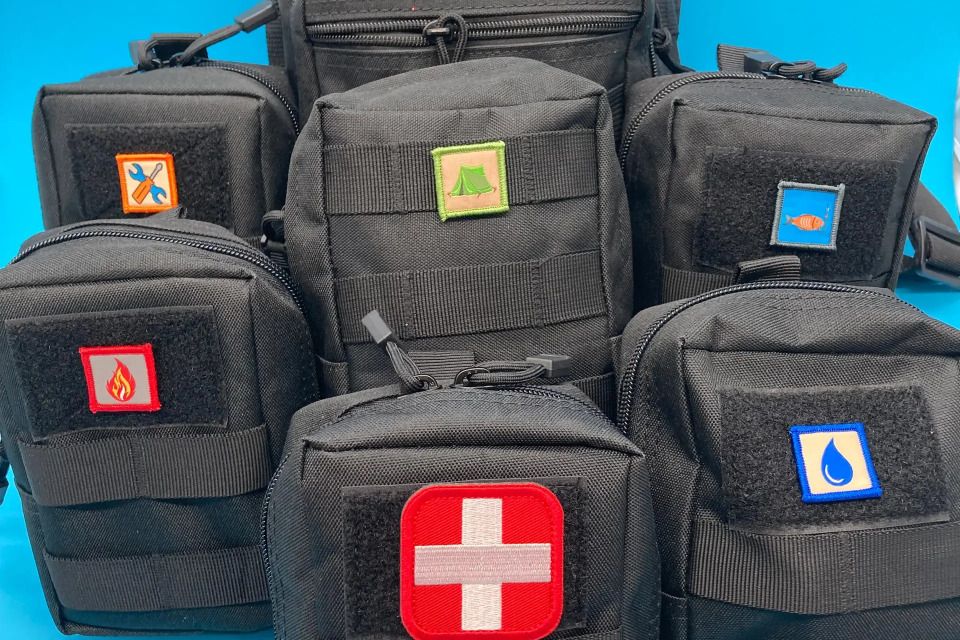
You should always pack essential survival supplies for safe drinking water, a means of starting a fire, temporary shelter (tarp, rain poncho, emergency mylar blanket, emergency bivy, etc.), medical first-aid kit (Trauma Kit, if available), something to boil water or cook in, some means of fishing or snaring small game and some essential tools (knife, multi-tool, compass, cordage, etc.). Those are the bare minimums. Our kits are modular with molle attachments for your backpack and are marked with icon patches to identify the contents. This helps to organize your bug out bag and eliminate the need to scramble searching through your bag when you need a specific item. See https://goldendragontactical.com/made-for-you-kits for a complete list of available kits.
Your bug out bag should also include other useful items as long as the weight is not a problem for you. If you end up walking for days or even several hours, a ruck weighing 40 lbs will seem like 80 lbs. Don’t carry too much, but carry enough. Instead, opt to pre-plan your destination and prepare a few critical caches at that location. See our blog on Selecting a Bug Out location https://goldendragontactical.com/blogs#post_12751483.
Here are a few useful items you may want to include, but again, consider the weight:
Folding camp/pruning saw
Hatchet or camp axe
Sheathed Hunting Knife
Hammock with mosquito net and rain fly
Folding shovel
Telescoping fishing rod with small spin-cast reel
Small collapsible pail
Small minnow trap
Rifle/shotgun/handgun and ammo
Extra pair of wool socks (wool stays warm even when wet)
A pair of leather work gloves
A change of clothes, depending on your weather conditions (layer when possible and avoid cotton garments)
Comfortable leather hiking boots
A hygiene kit
Sunscreen
Regardless of what you choose to carry or cache, you need to acquire knowledge of how to use these items. Knowledge is power and lack of knowledge can be deadly. Being prepared means you have a plan and the ability to execute the plan. But planning is futile unless you practice. Be ready, be prepared, be safe.
What Medicines Should I Pack in My Bug Out Bag
Most of the younger generation reading this ( or not) are less concerned with anything more than Tylenol/Advil and maybe some antibiotics and antiseptics. However, for those of us that are a little longer in the tooth, prescription medication for any long-term period is a real and growing concern. We have become so chemically dependent on prescribed medications, that to go without for any extended period, can be fatal. Unfortunately for most, stockpiling anything, more than about 90 days, is not economical nor practical. Of course, the best approach would be to gradually wean yourself away from some of your prescribed drugs by using a natural substitute. That is not the easy road and most of us choose to take the more convenient path. I have to admit, I’m no different and at my age I prefer to pop a pill than to make a natural remedy. But, I have at least compiled enough resources and knowledge that if push comes to shove, I can replace some of my critical meds.
Below is my best advice gleaned from that of others trying to address this critical issue. Also, I have provided links to other sites for certain things to prepare, stockpile and store in a cache, that will not be available in an extended crisis period. My purpose here is to help you prepare and gain the knowledge with references to other materials. For prescription medications, try to gradually build a stockpile by leveraging your insurance. Typically, you can refill a 30 day supply every 28 days. Yeah, I know that takes a long time to build a sufficient buffer, so start now. Try to leverage mail ordered 90 days supplies where you can and use GoodRx and Mark Cubin’s Cost Plus Drug site: https://www.costplusdrugs.com/ to help reduce the out-of-pocket costs.
Prescription medications:
Antibiotics such as Penicillin (or others such as Amoxicillin and Tetracycline) and pain killers like Percocet, Vicodin and Tramadol have a long shelf life, although their strength and effectiveness diminish over time. They typically retain about 90% potency for about 5 years and some studies suggest as long as 15 years past expiration date. These types of drugs should be stockpiled in a cool, dry environment. Unused prescriptions of these should be saved even though doctors and pharmacies warn against it. Disclaimer: This is my opinion based on medical studies I have read (reference: https://pmc.ncbi.nlm.nih.gov/articles/PMC7040264/) and is not intended to be medical advice.
Insulin comes in several different types and from different manufacturers. If you currently use insulin, examine the expiration date on the package or vial. According to the product labels from all three U.S. insulin manufacturers, it is recommended that insulin be stored in a refrigerator at approximately 36°F to 46°F. Unopened and stored in this manner, these products maintain potency until the expiration date on the package. Insulin products contained in vials or cartridges supplied by the manufacturers (opened or unopened) may be left unrefrigerated at a temperature between 59°F and 86°F for up to 28 days and continue to work. Extreme temperatures reduce the effectiveness of the product.
Bood Thinners such as Brilinta, Eliquis and Warfarin have a shelf life of about 3 years. But be cautioned, even a small decrease in effectiveness may result in fatal complications. If you are currently taking any type of blood thinner, be very cognizant of foods you are eating with high levels of Vitamin K, which is a coagulant.
Statins such as Lipitor (atorvastatin) have a shelf life of 3-5 years but may lose some effectiveness after about 24 months. Of course, in a survival situation you will be eating less fried foods and less LDL cholesterol packed foods since the highest levels of cholesterol is found in processed foods and dairy products.
Antidepressants and anxiety medications’ main risk is that the medication will not work as intended, which is dangerous if treating severe anxiety or panic attacks. Typical shelf life is 1 to 5 years after manufactured date.
Meds for Kidney Disease, these medications, with a shelf life of 1 to 5 years, are the cornerstone of CKD treatment, as they help reduce protein leaking into the urine and lower the workload on the kidneys:
ACE Inhibitors & ARBs: Commonly prescribed blood pressure drugs that end in "-pril" (e.g., lisinopril) or "-sartan" (e.g., losartan).
SGLT-2 Inhibitors: Once-daily medications like Farxiga (dapagliflozin) or Jardiance (empagliflozin) that help protect both heart and kidney function.
Non-steroidal MRAs: Medications like finerenone are used to protect the kidneys and reduce heart disease risk in patients who also have type 2 diabetes.
The above only represents a small segment of common prescription medications. For your specific medications, you should research the shelf-life expectancy and prepare accordingly.
Now let’s cover over-the-counter items that you should have stored in a cool dry location.
Antiseptics/Anitbiotics:
Isopropyl alcohol (70%)
Hydrogen peroxide (3%)
Listerine (with alcohol)
Povidone-Iodine (Betadine)
Benzalkonium Chloride (Bactine)
Neosporin
Antiseptic wipes
Allergy/rashes:
Hydrocortisone (used for rashes, poison ivy and bug bites)
The location you choose for your Bug Out is of the utmost importance from a number of perspectives, but maybe the most important is to be near a water source. You must have fresh water to survive. Selecting a location that is near a larger body of water or river has the obvious benefit of providing a food source as well. While foraging for wild edibles is still a necessary task for long term survival in the wild, and trapping or snaring small game can also be beneficial, your best food option is fish.
Fresh water fish come in all types and sizes and can be caught in a number of ways using simple traps, fishing lines and various baits found in the wild. A simple pole made from a small sapling with a line from an inner paracord string and a hook from your fishing kit will give you a fighting chance. Learn to build a variety of fish traps to catch small fish. Build a fish kit for your bug out bag. Our modular Dragon Fish Kit is a great option, providing monofilament line, hooks, split-shot lead weights, bobbers, artificial bait and an auto yo-yo reel (https://goldendragontactical.com/made-for-you-kits).
Fresh water fish found in most rivers and lakes in the eastern U.S.:
Largemouth and Smallmouth bass
Panfish including varieties of Bluegill, Sunfish, Crappie
Several varieties of trout including Brook Trout, Lake Trout and Brown Trout
Bottom feeders including Catfish, Carp and Redfish
Walleye, Northern Pike and Yellow Perch found in cooler northern U.S. lakes
Whatever species you are fortunate enough to catch, don’t hesitate to use as much of the fish as possible. If you land a female in season, be sure to look for eggs (Roe). It will be a small mass of golden color. The roe of all U.S. fresh water fish are edible. As you are removing the entrails, set the roe aside for later, covered in fresh water. When you are ready, clean any remaining debris from the roe and then fry it in a small amount of oil until golden brown (usually only a couple of minutes on each side.
In addition, save the heads and entrails to use as bait for other fish or especially for turtles. Turtle meat is exceptional and though some people say it tastes like chicken, I think it is more like pork loin in texture and consistency as well as taste. You be the judge, but don’t pass up the opportunity to capture turtles for food. There are several varieties which are edible, all of which are water turtles. DO NOT EAT A LAND TURTLE, such as a gopher turtle or a box turtle.
Turtles
Common Snapping Turtle: The most popular choice, known for yielding a significant amount of meat that tastes similar to chicken or pork.
It is crucial to remove the yellow fat from snapping turtles, as it can have a strong, unpleasant flavor
Softshell Turtles: Highly prized for their meat, particularly in Southern regions.
Diamondback Terrapin: Historically a delicacy; they are still consumed, though sometimes protected or restricted based on local regulations.
Cooters and Mud Turtles: Considered edible and traditionally eaten in certain regions. Personally, I would pass on these. I have tried Mud Turtle meat and I thought it to be unpleasant and it smelled bad. The one taste I took, I spat out.
How to Clean and Eat Snapping Turtle (reproduced from MeatEater, Inc.) This also applies to the other species mentioned above.
There’s not a lot of edible meat on a snapping turtle and most turtle folk only eat the legs and neck. It should also be noted that turtle meat often contains salmonella, and since they often swim in dirty water, it’s best to wear plastic gloves when you’re field dressing them and when handling the raw meat. If you catch your turtle alive, it can be a good idea to keep it in a tub or basin of clean fresh water for 24 to 48 hours before killing and butchering it. Be very careful with a live turtle as it can easily sever a finger or cause a would that will easily become infected.
A lot of people are intimidated by the idea of cleaning a turtle with an armored shell that seems almost impenetrable. Yet, when you know how to do it, it’s incredibly easy. To start, remove the turtle's head and then hang it upside down by the tail to drain the blood from the animal. Next, cut and remove the bottom shell by slicing through the joint between the two sections of shell on both sides of the snapper and then pull the bottom shell away from the turtle’s body. Remove the entrails and then cut the legs and neck from the inside edges of the top shell. Using a sharp filet knife, skin out each leg and the neck by sliding the tip of the blade along the length of each piece of meat, and then peel and cut away the skin until you’re left with clean, pink turtle meat. Be sure to cut all the bright, yellow fat off the meat prior to cooking it, as it has a very strong fishy flavor that can corrupt the meat and make it taste like the bottom of a chum bucket.
The meat of a snapping turtle is fairly unique in the wild game world. A lot of people compare it to chicken but it’s more along the line of pork with a bit of a seafood edge. Like squirrel, most people who try snapping turtle for the first time are utterly surprised with just how good it tastes. It has a firm texture, similar to rabbit, with a very distinct and slightly sweet flavor. It’s great on its own, tossed in flour and then fried. Snapping turtle is perfect for chowders, stews, and soups, and it’s a fantastic substitute for chicken or pork in any sort of mishmash dish with rice. You can also grill turtle meat, parboil it and bake it.
An often overlooked fresh water delicacy is the Crawfish. They are found in small and shallow fresh water streams around and under rocks. What appears similar to a tiny brown lobster provides edible meat in its tail section. Simply break off the tail behind the thorax, peel the shell from it and then fry or boil the meat. There won’t be much meat, but it is sweet with the same consistency as lobster tail or shrimp. Don’t discard the head portion but rather use it as fish bait.
Another overlooked fresh water delicacy is the fresh water Mussel. These are small to medium shellfish found around rocky shoals in streams and rivers. The shell is typically black and blends in with surrounding rocks. The larger ones usually have a dark mosey surface. Place these is clear clean water for a couple of hours, then boil or steam them. Mussels, like other shellfish, filter the water through their membranes and therefore sometimes can become contaminated from toxins in the water. DO NOT EAT THEM RAW.
And let’s not forget the Bullfrog. They can be found around the edges of rivers, streams, lakes and ponds. It’s best to hunt them at night by shinning a strong light along the shoreline. Their deep throated croaking gives them away and their eyes shine like mirrors to the light directed at them. The best option is to use a gig to spear them. Once you have one, sever the legs from the body. They are the only edible part. Remove the skin and fry them in a little oil. They may dance a little while they are cooking but they are very tasty with the texture and consistency of chicken. Save the head for fish and turtle bait.
I would be remiss if I didn’t cover some edible plants found along the water’s edge. The most notable and versatile is the Cattail. They grow in abundance along the water edge of lakes, ponds, and even ditch lines where water stands. Many parts are edible depending on the time of the year.
Green Shoots: Best harvested in early spring when they are 4–16 inches tall.
Preparation: Peel away the tough, fibrous outer leaves until you reach the tender, white inner core.
Raw: Slice and add to salads; they have a mild, cucumber-like flavor.
Cooked: Sauté in butter, stir-fry, or boil like asparagus.
Immature Flower Spikes: Harvest in late spring/early summer while the flower spikes are still green and hidden in the leaves. DO NOT EAT THE BROWN FLUFFLY “CORNDOG SHAPED” stage of the cattail; it is mostly seeds and fluff that will leave you with a mouthful of unpleasant fibers. There are other uses for it, but it is not edible.
Preparation: Peel away the outer leaves to reveal the green flower.
Boil: Place in boiling water for 10–15 minutes until tender.
Steam/Roast: Steam or grill them until heated through.
Serving: Eat them just like corn on the cob by nibbling the tender portion off the central woody stem.
Roots: These can be harvested year-round but are best in fall and winter when starch levels are highest.
Preparation: Scrub thoroughly to remove mud and trim off small branching roots. Peel the spongy outer layer to reveal the white core. DO NOT EAT RAW.
Cooking: Roast over embers until the outside is blackened. CAUTION: These are very fibrous. Only chew for the starch content and spit out the fiber strands. If you swallow these it can lead to a tummy ache.
Starch Extraction: This is the most productive way to use the roots. Crushing roots in water allows the starch to settle to the bottom of a container; pour off the water and let the starch dry to use the "flour" for thickening or baking.
Lateral Rhizomes: These are the white pointed “tusk-like” portion just below the roots.
Preparation: Rhizomes are wonderful raw or cooked. They have the subtle cucumber-water chestnut flavor of the hearts, with none of the stringy fibers. They're crisp, but more tender than a radish Slice them into ¼” pieces and eat them raw mixed with other salad greens.
Other Uses:
Firestarter: The cottony fluff inside the brown flower head makes an excellent tinder, even when damp.
Oil Lamp: Dip the brown flower head in oil and light it, it’ll burn for hours.
Insulation & Absorbency: The fluff inside the brown flower head was used by Indigenous peoples for bedding, diapers, and padding.
Weaving:Dried and re-soaked leaves can be turned into baskets, rope, or even hats.
Medicine: The gel inside the lower stem soothes burns and insect bites. Mash the root into a poultice or burn it to use the ash on wounds.
The next overlooked plant is watercress. It is a peppery, leafy green vegetable from the mustard family, known for being highly nutritious and rich in vitamins C and K, calcium, and antioxidants. It grows in fresh water (generally shallow, cold, running water, such as springs, streams, and brooks). It often grows in shaded, slightly alkaline water) and can be eaten raw in salads or cooked in soups and stir-fries, offering a pungent flavor that mellows when heated.
Don’t pass up the water lily. Nearly all parts of the water lily are edible, including the seeds, flowers, young leaves, and root tubers. They are highly nutritious, providing plant-based protein, antioxidants, and essential minerals. The seeds and petals are the most popular and palatable components, while roots and leaves are often boiled to reduce bitterness.
Seeds: The seeds of many water lily species are starchy, protein-rich, and can be dried and popped like popcorn or ground into flour.
Flowers: The petals are slightly sweet and can be eaten raw in salads, used to brew herbal tea, or fried in a sweet batter. It is generally recommended to remove the central, bitter reproductive parts of the bloom before eating.
Young Leaves: Young lily pads and unopened flower buds can be plucked from the water and cooked as a leafy green vegetable. They are best boiled first to remove any natural bitterness.
Rhizomes: Like the cattail, water lily rhizomes can be boiled or roasted. The outer rind should be peeled away, after which the starchy interior can be sliced, dried, and ground into flour.
Although, most water birds are protected by federal and state laws, in a time of crisis they could mean the difference between going hungry or providing an emergency meal. Catching them on the other hand will prove quite challenging. The most effective way will be to set bird snares at the water’s edge. There is little need trying to bait them as they feed mainly on live fish. The snare should be designed to catch their foot as they wade into the water. Use a modified Hopi bird snare (https://www.youtube.com/watch?v=HdmDUWvkOGY) , making the string loops a little larger for the wading birds. Once snared, they will not be able to fly away with the weight of the log. Unfortunately, you can’t really practice this because snaring water birds is illegal.
I can’t over emphasize the importance of the choice of your Bug Out location. Take some time planning and scouting multiple possibilities for the options that provide the most natural resources. Remember, prepping is about planning, knowledge and practice.
Foraging for Fishing Bait
There are dozens of possible wild live baits to use for fishing. Many depend on the time of year and location.
One of the best baits I have ever found is the Bullweed Worm. It is a tough larva that lives until maturity in the giant ragweed or bullweed commonly found on roadsides and along fence rows. The common “Stinkbug” bites the young tender stem and lays an egg inside the bite. The larva emerges from the egg in mid to late spring.
A bullweed worm (or ragweed worm) is a small, whitish grub or larva found inside the stems of giant ragweed (locally known as "bullweed" or horseweed), primarily in the Southern United States. Often used as premium bait for panfish like bream, these worms are harvested by locating rotten spots on weed stalks, which are then split open to reveal the larva. Simply cut-off the stem about 5-6 inches on each side of the bite mark. Your gathered stems can then be carried to your fishing spot and opened one at a time when needed. This allows the larva to remain undisturbed for several days.
Appearance: A small, white larva or grub that lives in the plant's pith.
Fishing Use: Highly regarded by local fishermen as excellent bait for bluegill and other bream.
Harvesting: Collected by examining stems for rotten spots, then cutting and splitting the stalk to remove the worm.
Another tried and true bait is the earthworm. They are commonly found in soft loamy soils and are easily found by digging shallow holes. In the early evenings after a soaking rain, you may find them on top of the soil. They are called “nightcrawlers” and are typically larger than the common earthworm.
One particular strategy is called “Fiddling for Worms”. If you are located in a wooded area where the soil is rich and there are a number of small saplings, you will find this method very easy.
Locate a small sapling about 1” to 2” in diameter
Scrape away the leaves on the ground in about a four foot radius around the sapling
With a folding pruning saw, cut the sapling down at about waist high
Saw vertically down the remaining trunk, slowly
The vibrations of the sawing will extend down into the roots and earthworms will begin to work their way to the top of the soil.
Of course, crickets, grasshoppers, caterpillars, beetles and just about any kind of larva are good bait choices. Grubs and centipedes can typically be found in or under decaying wood.
The next best bait will be minnows. However, you must be careful where you place the hook to keep the movement as natural as possible. With minnows, many people want to hook them through the mouth. This reverses the minnow preventing it from moving naturally. You are best to hook it just behind the fins so that it can face forward and move freely. With worms, you want to leave at least a an inch hanging off of the hook so that it can wriggle around. To catch the minnows you will need a small close knit mesh net. You can also trap them by building a fish basket trap.
A bottle trap is one of the easiest ways to get some bait. Take a plastic bottle and remove any labels that are still on it. Use a knife to cut off the top of the bottle just below the taper. Flip it upside down and insert it back into the base. You can punch holes and use cordage to attach the two pieces together, or you can just shove it tightly into the base. You may want to cut a larger opening if you want to target larger bait. Put some rocks in the base to weigh it down. If you have any small scraps of food, add them to bring in the minnows.
For a larger minnow trap, you can build an “M trap.” This trap uses the same principles as the fish swim in and cannot find their way back out. You will need some shallow water for this to work. The easiest way to build your ‘M’ is by using rocks. Start stacking and piling rocks to build a wall in the shape of an ‘M.’ You want the base of the ‘M’ to reach the shoreline. In addition, you want to leave a small opening at the cleave of the ‘M’ for fish to swim in. You will need your wall to be tall enough that it comes completely out of the water. This design works better without bait than the bottle trap. Often, you can scare a large group of minnows into your trap simply by splashing around in the water. If you have trouble removing the minnows from the trap, gather a bundle of foliage or grass. Drop it on top of some of your minnows, and then use the plant material to scoop them up and throw them onto the shore. Then you can dig through the plants and pull out your bait.
There is one secret technique for finding the best bait possible to target the fish in your area. Once you catch a fish, clean it as you normally would. However, you will want to save the stomach and intestines. Use the tip of your knife to carefully open up the guts. Find a rock or tree stump and empty the stomach and intestine contents onto the flat surface. In most cases, you will find insects or other potential bait inside the guts. By doing this, you know exactly what that species of fish is eating. Rinse it off and reuse the stomach and intestine contents as bait on your hook. Do this with every fish that you catch. Then, if you run out of bait you will want to find those same insects or minnows in the area. This is by far the best way to identify bait for catching lots of fish in a survival scenario.
Here's an idea for making your own artificial bait:
Take a fishing hook and just above the barb and below the eye, wrap string around the curved part until it looks like a grub (fat in the middle and tappered at the ends.
Add a small bird feather.
Loop a small colored rubber band around the upper end of the string and then snip the ends to about an inch long.
You can even use a wide rubber band cut to about two inches long and hooked so that it trails.
What are the Best Bug Out Weapons
This question has multiple answers depending on your own personal preferences and has been debated for years on every Prepper and Survivalist website. But here is the hard fact, carry everything you can, again depending on what you have and depending on how much other stuff you may have to carry. The weapon itself may not be that heavy. You may have a sling you can use to help support the weight. The heavy part is the ammo and how much of it you think you will need. The below options address hunting for your food. While you can pack freeze dried or even dried foods in your Bugout Bag, the weight quickly becomes excessive for more than three days. You will eventually have to fish, set snares and traps, and hunt. Scavenging and foraging wild fruits, berries, nuts and edible plants are excellent add-ons, but your body needs protein and fat for long-term survival.
So, choose what fits you best.
For hunting, a single shot .22 caliber rifle with a short distance 3-9X32mm scope works great for small game. The 40 grain .22LR ammo is inexpensive (less than $12/100) and you can easily carry 1,000 rounds (about 8 pounds) in your bugout bag. The Ruger10/20 semi-automatic carbine is another good option and it weighs about 5 pounds and has a 10-round magazine. Add another pound for the scope and you just added 14-15 pounds to your bugout carry.
The next best hunting option is a single shot 12 gauge shot gun. Way too many ammo options here, but the best overall would be size 5-shot. A one-ounce load has about 170 pellets and a box of 25 weighs 2.5 pounds and costs $10-$14. This is an all-round load that is good for small ducks, pheasant, quail, turkey, grouse, squirrel, and rabbit. So, in comparison to a thousand rounds of .22LR, 75 rounds of 12ga 5-shot shells would be about the same weight. A single shot Winchester Model 37 weighs about 6 pounds. Similar models of other manufactures have similar weights. So, again 14-15 pounds to your bugout carry.
However, if you want to put big-game on your table, then you’ll be hunting for wild boar, deer, or possibly black bear. Again, lots of options. My favorite is the Mossberg Patriot .308 cal. bolt-action with a Vortex Viper HS 2.5-10X44 scope. The rifle weighs about 7 pounds and has a 5-round magazine, then add another pound for the scope. This is the best hunting scope I have ever used. The 2.5-10 optics gives you short-to-long-range options and quick target acquisition not found in many other scopes in its price range. 100 rounds of Winchester 147 grain full metal jacket weighs about 5.5 pounds and costs around $120. So, this option adds about 13-14 pounds to your carry. The biggest disadvantage here is what game is gong to be available to put on the table? Big game certainly will have more bulk, feed more people and last longer, but small game may be more plentiful and easier to acquire. Consider a 25 round box of 12 gauge rifled slugs to add to your shotgun option. Although, I would advise against using them to hunt bear.
There is always the option of a compound bow and graphite or aluminum arrows, or even a crossbow. These would certainly be lighter to carry and maybe a good option considering scarcity of ammo. They also require a greater deal of expertise and lots of practice.
One option might be an air gun/pellet rifle. These are relatively inexpensive and the ammo is cheap. Consider a self-pumping model in .17 caliber.
Another non-firearm option is the Wrist-Rocket, a modern-day slingshot. Ammo can be anything from small stones to metal ball bearings or even glass marbles. With practice, these are very effective for hunting small game.
At the end of the day whatever you decide to carry can also be used for defense. Consider your options, your budget, what you may already have on hand. Consider your bugout destination and the surrounding wildlife. If you already have a secured bugout destination, consider making a weapon and ammo cache, If you choose this option, be sure the cache is weatherproof and your ammo is secured in waterproof ammo cans. Make certain your cache is camouflaged, inconspicuous and very difficult to detect by others. The last thing you want is to reach your safe place and find it occupied by someone else with your weapons.
What About Sleeping Bags
If you are bugging out, it is not going to be a comfortable leisurely camping experience. That said, it’s best to prepare yourself with gear that is light, durable and doesn’t cost you an arm and a leg. Hopefully, you will not need it at all, so invest wisely. If you do need it, make sure it meets all your needs.
For sleeping arrangements, there are different options at varying price points. For example, if you just want something that will keep you warm and dry for a few weeks then an emergency bivy like the one included in The Golden Dragon Lair Kit, combined with a few extra emergency blankets would serve you well even if conditions turn out to be really cold. If you want to go really light, you could get a hammock tent and emergency bivy and have a good sleep system that keeps you off the ground. Our hammock with mosquito net is light weight and fits easily in our 25L Ruck. You can use the Rain poncho included in the Golden Dragon Lair Kit as a rain fly.
This can be a good option for those that like having a sleeping pad usually but would prefer to not have the weight and bulk. A hammock tent is also usually lighter weight and far less bulky to carry than a standard backpacking tent. This system will be far lighter than a conventual sleeping bag, sleeping pad and tent and the cost is reasonable at $55 for the Golden Dragon Lair Kit + $25 for the hammock with mosquito net. Remember that any space or insulation you can put between yourself and the ground will keep you warmer.
If you insist on a sleeping bag, and If you live in a mild or warmer climate than you certainly do not need to purchase a sleeping bag that is heavy. It may cost more and you will not be comfortable. Warmer bags add weight to your bag as well. Don’t be tempted to go overboard and buy a warmer bag than you need. It is far better to carry an extra emergency mylar blanket or two in case of freak weather events.
At the same time, you need to understand that you may need to bug out in bad weather and colder temperatures. For colder climates or just climates with four real seasons, you could plan well by having a mid-weight bag and a lightweight emergency bivy, that you can use as an additional layer on the outside of your bag and it may still be cheaper and lighter weight overall than having a really thick bag. Temperature ratings of sleeping bags are just estimates. All you can go by is the manufacturer rating. Sometimes there is an ideal comfort range rating and an extreme situation rating. Before buying any sleeping bag, make sure to read the fine print on the description so you don’t get the wrong bag for your needs.
If you tend to get cold easily then you might want to go with a bag rated to a lower temperature than what is typical in your climatic zone. Consider if you are bugging out to a higher elevation as well. It can get a lot colder the further up a mountainside you go.
A good sleeping bag can add some comfort to your bugout situation but be careful not to add too much weight to your carry. Make sure the bag is water resistant and can be compressed into a waterproof compression bag with straps to attach to your bugout bag. Add extra warmth by using a mylar emergency blanket as a liner. And be sure to insulate yourself from the ground.
When it comes to tents, your best alternative to carrying a shelter with you is to learn how to construct one in the wild. This is a critical mistake made by many so called preppers who are caught unpreppared in a bug out sitiuation. Some simple shelters can take only a few minutes to set up, while others take hours or even days to complete. Consider your circumstances. Expand your knowledge and learn some bushcraft methods of constructing a suitable shelter. There are litteraly dozens of YouTube videos to view and learn.
While this blog is more on the homesteading topic than survival prepping, it is nonetheless useful when thinking long-term. Growing your own vegetables and saving the seeds for future planting is a worthwhile effort just in case the local grocery store or farmers market ceases to exist. Excess food will be valuable assets to barter if society should collapse. In fact, it may be so valuable that people will kill to get it. So, if it should come to that, be careful who knows you have this asset. Vegetables for seed saving must ripen far beyond eating stage, often until they are overripe, soft, or dry (e.g., brown, rattling pods for beans). Fruit should typically show full color and, for items like squash/peppers, a hard, dull, or slightly shriveled skin.
Key Ripening and Seed Saving Guidelines:
Tomatoes: Allow to become fully ripe to slightly overripe. After removing seeds, they often need to ferment in water for 2-3 weeks to remove pulp and improve germination.
Peppers: Let them ripen on the plant until they are fully colored, and for best results, wait until they start to wrinkle.
Peas and Beans: Keep them on the vine until the pods are dry, papery, and yellow/brown.
Squash/Pumpkins: Must have a very hard rind, often left on the plant to the end of the season. They can even be stored for 3+ weeks after picking to ensure maximum maturity.
Cucumbers: Let them turn completely yellow and soft.
Eggplants: Wait until they turn dull brown or yellow-brown, far past the eating stage.
Preparation and Storage
Drying: After removing seeds (and removing pulp/fermenting, if needed), dry them on a screen, glass, or ceramic surface—not paper towels, as they will stick.
Time: Let them dry for several days to a few weeks, until they are hard and break rather than bend (e.g.,).
Storage: Store in a dry place in labeled paper envelopes or airtight containers.
Steps to Save Onion Seeds
Overwinter or Replant: Onions are biennials. In the second spring, leave mature bulbs in the ground or replant high-quality, stored bulbs from the previous year, leaving 4–6 inches of space.
Pollination: Onion flowers require insects for pollination. To maintain purity, isolate different varieties by 800 feet, or use mesh cages to prevent crossing
Harvesting: When the globe-shaped flower heads (umbels) turn dry, beige, or brown, and black seeds are visible, cut the seed heads with a few inches of stalk.
Drying: Hang the seed heads upside down inside a paper bag in a warm, dry area to collect falling seeds.
Cleaning (Winnowing): Separate the seeds from the chaff (debris) by shaking the bag or crushing the seed heads. Winnow by pouring the mixture from one container to another in light wind, allowing lighter chaff to blow away, or use a fine mesh sieve.
Storage: Store the dry seeds in an airtight container in a cool, dark, and dry place, such as a refrigerator or freezer, for optimal viability
To save sweet corn seeds, allow the best ears to fully mature and dry on the stalk until kernels are hard and won't dent with a fingernail. Harvest, dry thoroughly in a cool, dry, rodent-proof area, then remove kernels by hand. Store in a cool, dark, dry, airtight container, ideally in the refrigerator.
Steps for Saving Sweet Corn Seeds
Select Quality Cobs: Choose the largest, healthiest ears from your best plants, ideally from the middle of the plant.
Ensure Isolation: Corn cross-pollinates easily, so if you grew multiple varieties or have neighbors growing corn, your saved seeds might not grow true to type unless you isolated your crop (e.g., covering ears with bags).
Dry on the Stalk: Allow the ears to fully mature until the husks are brown and the kernels are very hard and shriveled (this is normal for sweet corn).
Final Drying: If rain threatens or the stalk is too wet, pull back the husks and hang the ears in a cool, dry place to finish drying.
Shell the Kernels: Once the kernels are rock-hard and cannot be dented with a thumbnail, remove them from the cob by twisting or rubbing.
Store Properly: Place kernels in an airtight container (like a glass jar or sealed envelope) and store in a cool, dark, and dry place. Adding a silica packet or using a layer of uncooked rice can help absorb excess moisture.
Important Tips
Variety Matters: Only save seeds from open-pollinated (heirloom) varieties. If you save seeds from hybrid (F1) corn, the next year's crop will likely not share the same qualities.
Viability: Properly stored, sweet corn seeds can remain viable for 2 to 3 years.
Pest Control: To prevent beetles or moths from ruining the seeds, you can store them in the freezer for two weeks to kill any larvae, then move them to a cool, dark place.
To save squash seeds for planting, select a fully mature, over-ripe squash, scoop out the seeds, and wash away pulp using a colander. Dry seeds on a screen or paper plate in a cool, dark, airy place for 7–10 days until brittle, then store in an airtight container or envelope.
Steps for Saving Squash Seeds:
Select Mature Fruit: Choose a squash that has stayed on the vine long after it was ready to eat. The skin should be very hard and tough (e.g., in butternut, the skin turns a deep tan).
Extract Seeds: Cut the squash in half and scoop out the seeds and pulp.
Clean the Seeds: Rinse the seeds in a colander under running water to remove pulp. To separate viable seeds, put them in a bowl of water; mature seeds sink, while immature/empty seeds float
Dry Completely: Spread seeds in a single layer on a screen or parchment paper. Place in a warm, dry area with good airflow, away from direct sunlight for 1–2 weeks.
Test for Dryness: Seeds are ready when they are hard, non-pliable, and break rather than bend when bent.
Store Properly: Place dried seeds in a labeled envelope or airtight glass jar. Store in a cool, dark, and dry place, such as a closet or refrigerator.
Prevent Cross-Pollination: Squash easily cross-pollinate with others of the same species (e.g., zucchini with yellow crookneck). To ensure pure seeds, you must hand-pollinate and cover flowers.
To save lettuce and cabbage seeds, allow the plants to fully mature and flower ("bolt") until the seed heads are brown and dry. For lettuce, place a paper bag over the flower head to catch seeds; for cabbage, cut the dried pods. Store cleaned, dry seeds in sealed containers in a cool, dark, dry place, such as a refrigerator.
Saving Lettuce Seeds (Annual)
Let it Bolt: Allow your best-performing lettuce plants to grow tall, flower, and then dry out. The flowers will turn into fluffy, white, dandelion-like heads.
Harvesting: When the heads are dry, cut the stalk and shake it into a paper bag to release the seeds. Alternatively, pick the dry, fuzzy tops by hand.
Cleaning: Rub the seed heads to release the seeds. Use your breath or a light breeze to blow away the light debris (chaff), leaving behind the heavier black or brown seeds.
Storage: Let the seeds dry further on a tray for a few days, then store in an airtight container in a cool, dark place.
Saving Cabbage Seeds (Biennial)
Understand the Cycle: Cabbage is a biennial, meaning it produces seeds in its second year. You must leave the plant in the ground (or replant) to go through winter.
Prevent Cross-Pollination: Cabbage crosses easily with broccoli, kale, and other Brassicas. Keep your seed-producing cabbage at least half a mile from other flowering Brassica oleracea.
Harvesting: When the seed pods turn brown and dry, pull the plant and hang it upside down to dry completely, or harvest the pods individually.
Processing: Crush the pods to release the dark brown or black seeds.
Best Practices for Storage
Dryness is Key: Ensure seeds are "bone dry" to prevent mold.
Storage Containers: Use glass jars, envelopes, or plastic bags.
Labeling: Label with the variety name and date of harvest.
Long-Term Viability: Lettuce seeds can last up to 6 years, and cabbage up to 5 years if kept in a cool, dark, dry place.
Foraging
Foraging is an important skill for survival in the wild, but if you don’t have the knowledge, it can be dangerous. If you have acquired any of the Quick guides to foraging on the internet which identify wild edibles, be very careful. Often times, these guides are unreliable and can lead you to selecting something that is toxic or at least lead to upset stomach or diarrhea and sometimes kidney problems. Many of these guides fail to identify what part of the plant is edible. For example, Elderberry fruit is edible, but the stems are toxic.
I have foraged, opportunistically, for years, picking Blackberrys, Raspberries, Black Cherries, Wild Plums, Muscadines, Possum grapes, Black Walnuts, Hickory nuts, Wild Chestnuts (but not Buckeyes), Hazelnuts, Persimmons, Wild Strawberries, Wild Blueberries, Pawpaws, Morel Mushrooms, Watercress, Wild Mustard, Dandelions, Wild Carrot, Cattails, Ramps and yes, even Poke weed (requires a special cooking process to remove toxicity). But, foraging for survival is a much different process. Foraging takes time and knowledge of the area, what grows where and when; what is safe to eat and what is not safe, and how to preserve what you have collected for later when the growing season ends.
Ashely writes a blog post of her foraging and posts it to her website. Her articles are not only superior in identifying safe and healthy wild edibles, she provides comparisons of toxic varieties with pictures, recipes, geographic growth zones, and even preserving. You can subscribe to her free weekly newsletter. She even has a medicinal guide. Believe me, this is your best source of training for foraging.
Your survival is dependent on your gear, knowledge and application of what you have learned. It cannot be a last minute thing. You must prepare. Learn these critical skills now before you need them. Practice the skills you learn so that you can survive.
Pack This Inside your Dragon Cook Kit
Just some additional tips for your Bug Out bag. Pack this in your Dragon Cook Kit for a little extra insurance against hunger.
Vacuum sealed bag with ½ cup rice
Vacuum sealed bag with ½ cup elbow macaroni
Vacuum sealed bag with 2 packs of instant oatmeal (raisin and walnut adds nutrients)
2 or 3 tea bags
Use small oxygen absorbers placed inside of the sealed bags to retain freshness. These items are intended for temporary emergency use to help sustain you until you can locate a food source.
I also have a small stainless steel container (~5.5”L X4” W X2.25”D) with a latched lid which stores a vacuum sealed bag with 1 cup of dried beans, a small can of Spam or Tuna or Sardines or Chicken, a vacuum sealed bag of corn meal mix, extra packets of sugar, salt and black pepper, a small plastic container of Crisco and two or three packets of instant lemonade mix. Another good option is instant potato flakes or powered eggs. This doesn’t add a lot of weight, but it sure is tasty when you need it. The corn meal mix can be used to make cornbread cakes or to coat fish to fry. Just a half cup of dried beans soaked overnight in water, then drained and boiled the next day is a good protein rich meal. These contents could be stretched into three additional small meals to keep you going.
Of course there is always dried jerky, protein bars, trail mix and even pemmican and hardtack. Remember, this is about survival in the short term and not about a family outing for fun. Be sure to pack items that won’t spoil quickly and replace expired canned goods. Spam, while not a favorite of a lot of folks, has a long shelf life. It can be fried in slices or diced and added to beans or macaroni for a complete meal. It has some fat content, which is helpful in these situations for your digestion. Sardines packed in olive oil is another good option. Although not to everyone’s taste preference, they have a long shelf life and contain Omega 3 fats. Save the oil from the can to use for frying other fish.
While I've never been a big fan of freeze dried meal packets (they typically are expensive and almost always require salt), there are two that I think may be worth a look. Try the Mountain House Breakfast Skillet and the Peak Refuel Beef Strogonoff. Just add boiling water, allow it to rehydrate and you've got a satisfying meal.